Friday, July 11, 2014

CoC - Walkers

Well as I alluded to in my last post, this post will be about the walker heavy kit and how I ended up magnetizing them.  First, however, lets see just exactly what it is that we get in that box...


Quite a lot of pieces just like we can come to expect from CoC models.

As with plastics in general the pieces go together nicely and easily.  That is once you actually clean off all the extra flashing and mold lines that litter the pieces in varying degrees.  Though once you are done with that and ready for assembly you may want to take a second and orientate yourself among all the arm pieces since magnetizing the vector wont be a simple form of magnetizing the shoulders or elbows and your done.  Well, okay it will be for the left arm since each arm can be easily changed at the elbow as you will see in the pic below.


So what I did here was just glue the shoulder piece to the main body, the elbow joint to the shoulder piece and then put 3mm magnets into the elbow joint and the interchangeable weapons.

Now the right arm will be a little bit more difficult than the left due to the Monitor's arm having a completely separate shoulder piece unto itself.  So what I did here was that I put a 3mm magnet into the main body and the two shoulder pieces so that the two shoulder options can be switched.  Then I also put a smaller 2mm magnet into the shoulder piece where the elbow goes.  While, I put another 2mm magnet on the Inverter and Cipher arms (after gluing on the elbow to the Cipher arm seeing as the Inverter arm already comes with an attached elbow).


Hopefully the picture makes that a bit more clear and straightforward.

So that was my solution to the little problem that the right arm posed with its different meet points.  Hopefully, the hover vectors wont have such problems and they will have a more straightforward magnetizing process.  Unfortunately, I still haven't received mine so I can't say for certain but after seeing other people's pics online, along with the originals on the PP website, it looks like all the arms can be magnetized at the elbows, which, hopefully is indeed the case since that would simplify things quite a bit.

Well that's it for this post.  Stay tuned for whatever may come next :P.

Thursday, July 3, 2014

CoC - Father

Well there was a local tourney this past weekend, so I thought it would be a good time to switch and get some practice in with my Convergence.  Though, in order to do that I had to assemble most of my Convergence of Cyriss models since most of it was still sitting in their boxes (I like to paint before assembly).  So lets see what I chose to lead those forces...


That's right!  Father Lucant!

At first I was a bit surprised at his anorexic look.  Sure, I heard the comments that he is pretty skinny and thin but even after seeing those comments I wasn't prepared for how thin his pieces truly are!  However, I'm pleased to say that he looks much better and somewhat bulkier (not saying bulky) when put together.  Though lets not get ahead of ourselves just yet.  The model itself is made up of 15 pieces plus the base, which, at first might seem like a nightmare to assemble though I had a fairly easy time of it.  Seeing as I am planning to disassemble the model for painting at a later date I didn't end up pinning anything (except the staff fist/arm) and even after the 3 rounds Lucant was in one piece... well for the most part.  He did lose an arm when I accidentally knicked it with my fingers.  Then on the return swipe I took off another arm all in either his first activation or setup so I was a bit curious as to what state he would be at the end of the tourney.  Though I'm pleased to say that nothing else fell off for the remainder of the games and he still had one good arm so no worries :).  So even without pinning he is fairly stable and survivable though I will definitely pin him in the end.

The assembly itself was fairly easy even though I saw horror stories about it on the forums.  At first I glued the torso and hip together.  Then I did the legs, which, are nicely "numbered" with symbols as to which one goes were.  The legs did come off once or twice when putting on another leg though I was doing rush gluing and didn't give it much time to set.  Then the rest can be pretty much added in any order since they don't really block or bother one another.


Once done, he should look roughly like this.  Though when I end up pinning the model in its final pose I plan on doing a slight conversion of switching around his pointing arm with his his 3rd arm.  This should be a fairly easy and straightforward conversion where I switch the arms at the shoulder joint but I think it should give it a more dynamic look than this current pose.  I will definitely post some pictures when that's done and he is all painted so you can decide which one you like better.

As for the weekend... well I went 1-2 (1 win - 2 losses).  I've really gotten used to Hordes and their fury mechanic while having forgotten my Retribution roots of having to hand out focus first.  So I need to get back to playing Warmachine and using jacks.  This should also help to significantly cut down on the long thought processes that I had to go through at the beginning of each turn and thus speed up my turns. Which, is something that I will have to do, seeing as I clocked myself on my first game and only had a couple minutes left for my win.

Well that's it for now.  Up next?  Perhaps how I magnetized the walker jacks...

Wednesday, May 14, 2014

CoC - Mines

Another Convergence servitor solo that I've picked up after the Attunement servitor is the Reflex servitor.


Like all the other servitors so far they come in a blister of three so expect to see this x3 when you open up your blister.  As you can see there is not much assembly that is required seeing as the figure itself is all one part so you basically just need to attach the flight stand and you are done.  The model itself is fairly simple but then again what would you expect from a model that is a mine?  I've seen some pictures of some pretty neat conversions for this model where it is cut in half and just placed on the base to represent how it can dig-in.  If not for my tile basing I'd be quite tempted to copy the dug-in look since I found it to be quite a good idea.  Not only did the model look good but you can also theoretically make six models out of three so I thought I'd pass on the idea in case others would like to try it.

In game terms, I think that the model is quite good with its dig-in defensive ability and is thus pretty much safe from shooting or blast attacks.  Along with its counter-charge ability and proper placement it is also quite good at getting in the first punch and disrupting enemy charges.

Unfortunately, I haven't gotten around to painting these models yet either and seeing as they lack any assembly they most likely will be one of the last things that I get around to painting.  So don't expect to see any pictures of them painted any time soon :P.  Though, I will give you an idea of how they will look like with the colour scheme that I've thought up for them.  The main body will be black, the front grill will be red with the three vertical lines being purple.  As for the little pressure nobs covering the body, those will more than likely be bronze.

Friday, May 9, 2014

CoC - Bots

I picked up a box of Reductors not too long ago and I thought Id share the un-boxing of them with you.  So lets see what we've got...


First off we get two bags.  One that has all the bases in them and another one that contains all the parts for the models.  So lets rip those bags open to see what goodies we get.


Inside the bag there are a bunch of torsos/legs and heads and oh look another bag!  Unfortunately, I appear to have gotten one of my grunt heads lost sometime during the packaging process because I only got 8 heads.  However, I did get 3 leader heads since it looks like they package the heads in fours (1 leader + 3 grunts) and don't bother to remove the extra leader heads.  Unfortunately, the leader heads differ quite a bit for me to simply use one of the extra heads as a replacement for the lost grunts head.  Though I'm not too worried seeing as I'll be buying another box and am planning to magnetize the models.  So lets see what that last bag holds...


As expected, these models are also made up of a bunch of parts, which, seems to be typical for the Convergence of Cyriss.  Though, what did surprise me is that some of the arms are actually two pieces!  This can be seen on the model that is on the right.  It's blade arm only goes up to its forearm and then the shoulder part is a separate piece.  I'm not really sure why they needed to break those arms into two pieces when they were able to make some of the other arms as a single piece.  So be prepared for quite a bit of assembly and clean up work on the models, since I'm sure you can see from the pictures that the models have quite a lot of flash/mold lines that will need to be removed.

I will of course post some pictures once Ive got them cleaned and painted though I don't think that I'll get around to that anytime soon.  Until then you'll just have to imagine what the final model will look like once its painted.  I will be following the colour scheme that I used for the Angels, that is, mainly black with small portions  painted red (the face plates and shoulder pads).

Until next time...

Thursday, April 24, 2014

CoC - Heavy Infantry

Okay, so up next is the heavy infantry... I've had these bad boys for quite a while now and have been itching to write about them, though, I also wanted to unveil the painted models in the same article so had to wait until I got some pictures done of them.  Well guess what??  The long wait is finally over and I got some shiny new pics of the models Ive painted in the meantime.  First however, lets start from the beginning...

As with most Convergence models the heavy infantry box is packed with tons of separate pieces that will make up a single model.  Each model is made up of about 12 pieces!!  Though sometimes even more depending on the type of model we are talking about.  Lets just see a breakdown of this...


So, as you can see there are quite a lot of pieces!  Though even with the loads of pieces that you get it is fairly straight forward to assemble the figures.  The legs and arms have special key lock designs that can only be put together with their correct counterparts.  So the arm piece will only attach to the correct forearm piece and so on.  Which, is very nice.  HOWEVER, and there is a big however... the fists that go into the forearms are not labelled or matched whatsoever.  Which, can cause issues when you put the wrong weapon into the correct arm... like I did with my models even though I read somebody Else's warning on the forums about this exact thing.  Though to save a little face, I will mention here that I am magnetizing the arms to cut down on painting and the number of models that will need to be assembled/stored/transported.


As you can see in the picture, the magnet will completely remove all traces of the label that you use to differentiate the arms.  This is how I accidentally put a B and C arm together (whoops).  So if you wish to go about and put the magnets into the arms all at the same time then I suggest storing the different arms separately or marking them somehow because it will be hard to differentiate them once the letters are gone.  The left hand is easy to differentiate seeing as the fist is part of the forearm however the right arm has no telling sign and with all the right arms missing the fist portion, which fits each arm regardless if its a two-handed spear or single handed halberd.  So, watch out for this.  This is probably the biggest thing that could have probably been molded a bit better like the rest of the arms/legs that can only be put together with its specific counter-part.

A quick note here about putting magnets into your models... make sure you have the polarities right before gluing.  So far I haven't had the misfortune of putting the magnet in with the reversed polarity (knock on wood) but I image it would be annoying to remove.  As for the magnets themselves.  I think I'm using 3mmx2mm sized ones with the polarities reversed on each arm.  Meaning that the left arm being only attachable to the left socket while being repulsed on the right socket.

Though don't fret too much if you mix up one of the arms because boiling water is your friend.  Okay not really so do watch out and don't burn yourself!  Though using boiling water is a very good way of fixing any mistakes you may make during assembly.  Or to just straighten out those spears that that may be a little bit bendy and out of shape when you first unpack the figures.  The plastic itself reacts fairly well to boiling water so you can do slight pose altercations if you so desire, which, I found to be great due to a couple of the wide stances the models have.  Which, is a problem for me because my custom carrying case doesn't really allow the models hanging off their bases too much with their feet.  So dipping them into boiling water for a couple seconds is a great way to make the plastic pliable and bendy.  The plastic re-hardens quickly and remains strong from what Ive seen so far.  So even if you don't intend to repose your models, this method is a great way to fix arms that got the wrong weapon attached to it.

All in all, I'm very pleased with the models themselves and that you can customize them a little bit.  Okay, so lets see some of those painted models now...


So here are the 3 Ive painted so far.  After painting one Reciprocator I decided to only paint the bodies minus the arms for the rest of the models.  I decided to do this because I prefer to paint my models un-assembled, so this way I could assemble my finished models more quickly, while keeping the arms for a later date.  Seeing as the arms stay together due to the key locks and that I'm able to attach them to the model with the magnet, the models will be ready for the table top at a quicker date (with unpainted arms).


For the most part I stuck to my original concept that I had for these guys when I first saw their concept art, which was a Thamar Black body with some Solid Gold detail work on the bigger empty spaces that I could find.  At first I was planning on doing identical designs on the models but quickly gave up on the idea once I realized that I won't be able to pull it off with a fabricated template that I could just use on each model.  So in the end I went with simple yet different designs on each model that I could just eyeball and paint on free hand.  I'm definitely no pro and its not as symmetrical as I would have liked but I'm pleased with the results.  I'm also quite pleased with how I marked the model to know what health track I will need to mark on the card.  Unfortunately, its only visible on one of the models in the pictures so I'll give you a hint that the marking is on the model's head and the 3rd infantry's markings are visible.  On top of this extra little design work I continued with the pre-planned paint scheme that envisioned the cogs/hydraulics as Molten Bronze, the energy highlights as Beaten Purple, the "eyes"/energy coils as Genestealer Purple and the weapon blade as Pig Iron.

 For today's finally... a fully painted and assembled Reciprocator with C + B arm combination...


Thursday, April 10, 2014

CoC - Iron Maid


Here is the unpacked model of what I have come to call as the Iron Maid...  though do note that there is a metal tab that connects the legs and, which, inserts into the base.  I have however, already cut this off since those tabs interfere with my basing.  The model itself is nice and shouldn't be overly difficult to assemble even though its holding a two handed weapon.  I plan to first pin both arms while aligning up the fist portions and then pinning the fists into the arms.  I'm more than likely going to be leaving out the hip guards since I find that they give the model a maid/nanny look which is a bit ridiculous for me.  This is partly due to the head reminding me of the robot nanny from the Jetsons cartoon while, the hip guards give me the impression of really old dresses were the bottom half was widened out with wire frame.  The combination of the two provides the before mentioned serving girl image... though this might just be me imagining things.

Even though the model has some nice detail on it, I will be sticking with my simple paint theme for it.  Meaning that it will more than likely be pretty much black with few points of interest like the cogs/eyes/weapon.  I'm not sure if I will keep the face plate black like the rest of the body or if I will paint it something else like I did with the Angels of Death (Clockwork Angels)... time will tell.

Unfortunately, I'm not really sure when I'm going to get around to painting the model since I'm finding it difficult to find room for them in my lists even though the model itself is a steal for its point cost.  Perhaps I will try to move some things around in my lists to squeeze some in since I really do think it has good abilities and is quite cheap for what it can do.  In any event, I will of course post a picture of the finished model whenever I do get around to slapping some paint on it.

Monday, March 24, 2014

CoC - Flare Balls


With the release of the Clockwork Angels I also picked up some Attunement Servitors, which means that just like the Angels I don't have any pictures for you of the un-assembled servitors.  Although, I can say that the model originally comes in two pieces with the "gun" part (including top tubing) being a separate piece.  This is fairly easy to attach and if I recall correctly then I didn't even pin them on.  Which, should say something, seeing as I'm always pinning things even if its overkill.  The flight stand seen in the picture, however, is not what comes with the model but rather a Games Workshop flight stand.  Unfortunately, due to my basing (custom made), the PP flight stands don't particularly work well since they have a long tab at the bottom that goes into the cut out portion of the base.  So those flight stands are fairly un-useable with custom bases unless you wish to cut off the tab part.  Finding this to be too much of a hassle, I just opted to use a GW flight stand and simply just drill a new hole into the model and it's base.


Following my CoC paint scheme I painted the main body Thamar Black, the tubing Molten Bronze, the "visor" Skorne Red and the little energy lights Beaten Purple.  The only new color added was Genestealer Purple (GW paint) for the "eye".  I don't particularly like to mix paint colors that I intend to use over a long period of time or on numerous models since its hard to mix the exact same color once its dried/run out.  That said, PP doesn't seem to have any other shades of purple other than Beaten Purple so I had to branch outside of the PP brand.

Well that's basically it for the Attunement Servitor, seeing as its a fairly small and straightforward model that doesn't require a lot of work or thus explanation.  I'm not quite sure what the next post will be about seeing as I have multiple options available as to what to write about...  so I guess you'll just have to come back later and check in on things to see and find out :P.

Monday, March 17, 2014

Round 2

So I tried to put myself past my big blunder in round 1 so that I head into round 2 with a clear head.  In the 2nd round I was able to pick between either a Menoth player that I've played before or a Skorne player that was an unknown to me.  Not wanting to particularly play against Menoth and feeling comfortable against Skorne I chose Skorne to be my opponent.

The scenario: Balance of Power
The lists:

Skorne
Points: 42/42
Supreme Archdomina Makeda (*5pts)
* Molik Karn (11pts)
* Titan Cannoneer (9pts)
* Titan Gladiator (8pts)
Paingiver Beast Handlers (Leader and 3 Grunts) (2pts)
Praetorian Swordsmen (Leader and 9 Grunts) (6pts)
* Praetorian Swordsmen Officer & Standard (2pts)
Tyrant Commander & Standard Bearer (3pts)
Mortitheurge Willbreaker (2pts)
Void Spirit (2pts)
Void Spirit (2pts)

Legion
Points:
42/42

Vayl, Disciple of Everblight (*6pts)
* Angelius (9pts)
* Scythean (9pts)
* Typhon (12pts)
Blighted Nyss Legionnaires (Leader and 9 Grunts) (6pts)
Spawning Vessel (Leader and 5 Grunts) (3pts)
Succubus (2pts)
The Forsaken (2pts)
The Forsaken (2pts)
Thrullg (3pts) 

I won the roll off and decided to choose side and to go second.

Deployment

End of my 1st turn

My opponent's turn basically comprised of him putting out Leash on the Cannoneer, dragging it forward and taking two pot shots (with the Willbreaker's ancillary attack) at me that harmlessly missed.  Rest of his army just ran/advanced forward.

In my turn I advanced with the Angelius to take a boosted shot at one of the Swordsmen only to miss.  Ran forward and in front of the Pot with the Legionnaires only to have 3 of them attacked in the back to be stuffed into the Pot by its handlers.  Thus bringing out a Shredder which went rabid and advanced to kill a swordsman.  His second failed attack failed to kill the second swordsman in contact with him.  pVayl leashed Typhon forward, put out Tenacity on herself and Typhon as well and then proceeded to stare down Molik Karn.  Typhon advanced forward and attempted to spray the Swordsmen but was short while the Scythean moved to the side a bit for next turn.  Both Forsaken siphoned off 3 fury each so that they are also ready to do some damage next turn should I need them.  Now, at this point you might look at the picture and ask why did I leave a wide open lane to pVayl?  Well I was actually trying to bait my opponent to commit Molik seeing as I knew that if I could deal with him early on and not have to worry about an assassination run at any moment during the whole game then I would be better off.  So I left a lane and option open for my opponent to consider.  I also felt fairly confident that should he take the bait then I would survive.  Seeing as I was sitting on 4 transfers, had Dark Sentinel and was hoping for a free strike as well if he came straight at me.  If he decided to come in with a side step then that's already 1 attack less and I still had Dark Sentinel plus Talion to fall back on unless he stops outside of my Dark Sentinel range in which case he would need 2 side steps leaving only bought attacks that I should survive.

End of my opponent's 2nd turn

The swordsmen vengeance forward and attempt to kill the Shredder but fail to do so.  After some small contemplation my opponent takes the bait.  Activates eMakeda puts Leash on Molik to drag him closer, casts Road to War and then forgets to feat.  Gladiator puts out his animus on Molik and after the Paingivers whip him into a frenzy he charges straight at pVayl.  Excellent he fell for the trap... or did he?  He manages to stop with Molik still in the Scythean's line of site due to bad position on my part.  However he is also just a hairs width in range of pVayl meaning that I can fit in a large base in between us :).  So I choose the Scythean as my Dark Sentinel model and proceed to walk in between Molik and pVayl to block LOS.  Unfortunately, I cant completely clear the flag's base.  DAMNIT!  Oh well, time to to throw a boosted attack then.  Needing a 7 I roll a 4 on 3 dice.  Oh that's just great... not much point in hoping to knock out a spirit with Talion now.  Looks like my baiting plan just backfired.  After spending all his fury and having at least 1 attack miss, I take one hit on the chin, which, puts me at about 5 health and am forced to transfer damage another 3 times to each one of my heavy beasts.  Meaning that I suffered 4 hits even though he needed 9s to hit and was lacking his feat though did have future sight to see in advance if he needed to boost or not.  Had he feated this would have most likely been a short game with the way he was rolling.  Failing the assassination without the feat however he was forced to do as much damage as he could.  His Swordsmen got a charge run/order and proceeded to charge Typhon, the Angelius, a Legionnaire and the Shredder.  Going for mainly combo strikes he put in some damage into Typhon, killed the Shredder (fury gets siphoned off) and perhaps damaged the Angelius as well though he may have missed there completely.  He also killed a lone Legionnaire, which, I was very happy to see given that meant that I would get to use vengeance as well.  The Cannoneer puts out his animus and takes a shot at the Scythean (I think), which I don't recall if it hits or not.  The Void Spirit on the right passes through the obstruction being incorporeal and does a big hit on the Scythean. 

End of my 2nd turn
Seeing the damage done to pVayl I panic and decide that I have to go for an assassination attempt of my own otherwise I'm dead next turn.  Unfortunately, the completely undamaged Molik needs to be killed before I can free up my fairly heavily damaged beasts to even attempt such a thing and any beast I use on Molik will be one less I can use on eMakeda.  Before I can even get to that though I have some vengeful Legionnaires to play down.  Seeing their mistress's distress the Legionnaires kill all 3 Swordsmen that are engaged with Typhon, while a lone warrior kills another Swordsman engaging the Angelius in a flurry of vengeful attacks.  The Pot is now filled with corpses and ready to go, unfortunately, my plan to kill Molik Karn requires the pot to be moved up so it doesn't block the left Forsaken's path to Molik.  First however the Legionnaires are activated to make way for the pot and thus charge the Swordsmen to finish them off.  Unfortunately, my dice rolls continue to be lackluster and only manage to kill a single Swordsman with 5 attacks.  Pot gets moved up and brings out a Harrier that gives itself True Strike and charges Makeda.  Taking a free strike from the nearest Swordsman the Harrier suffers some damage and then proceeds to do no damage to Makeda.  Left Forsaken activates and walks towards Molik and uses Blight Shroud only to be about a millimeter or two short of Molik.  Just wonderful... nothing seems to want to go my way.  Thrullg takes his swings at Mollik and puts in a couple points of damage.  Okay, next Forsaken... this one reaches without much of a problem and proceeds to put around 13 points of damage into Molik.  Molik is now halfway dead but I'm not overly confident that pVayl will be able to finish it off but I don't want to use up one of my beasts so she activates and proceeds to cast 2 Malices into Molik and finishes him off.  I have to also heal a point in Typhon since his Spirit was knocked out last turn and with her final action for the round she kills the Void Spirit engaging the Scythean with her Oraculus.  Time for Typhon and my counter assassination run.  Ironically enough one of my teammates asks a feat question pertaining to his match at which point I half jokingly reply why he couldn't have asked a minute sooner and then I feat as well.  Having missed my feat opportunity Typhon advances and sprays the standard bearer along with eMakeda.  I ask what eMakeda's stats are since I was too dumb to look at it beforehand so am quite shocked to hear that the skinny and frail looking warlock has better stats than Thagrosh!!! WTF???  This is quite the surprise for me and I'm unfortunately already committed now so all I can do is start spraying away.  Having to boost to hit I only have 1 attack in which I can boost to damage as well.  This one boosted damage went into the Gladiator seeing as the Cannonneer was all furried up.  Another minor hit is absorbed by Makeda I believe.  That leaves my Scythean and Angelius which ends up doing a whole lot of nothing. The Scythean on the other hand kills the Willbreaker that is blocking my way to the Cannonneer.  Had I remembered to feat I could have now repositioned my forces so my beasts survive the next turn.

End of my 3rd turn
Seems like I'm unfortunately missing a picture of the end of my opponent's turn :(.

My opponent finally feats in his 3rd turn and proceeds to slam Typhon for 8" through my Spawning Vessel with his Gladiator.  I lose 4 handlers which fills up the pot with corpses ready to disgorge a last Shredder as the Gladiator follows up the attack and proceeds to smash the Pot.  The Swordsmen then wipe out my Legionnaires along with the newly spawned Shredder... that didn't last long.  The Void Spirit charges my Angelius and kills the lazy beast that pretty much did nothing the entire game while his Cannoneer kills off my Scythean.

Being left with even fewer options than before I try for another assassination run.  pVayl casts Rampager on the Gladiator after shooting it with her Oraculus.  The Gladiator is turned around and sent towards eMakeda.  Through the spellbound Gladiator I cast a Hoarfrost but unfortunately don't critical and do some damage that gets transferred out.  Typhon advances and does another three sprays, which, are ignored or transferred.

PVayl then gets finally assassinated.

In hindsight I should have done quite a few things differently.  Given the opportunity again, I would have probably still went for the baiting trick, since I believe that had I not rolled so poorly for the better part of the match then it would have worked well.  Especially if I had positioned the facing of the Scythean slightly better and thus provided me with a free strike on Molik Karn as well.  Unfortunately, sometimes the dice turn against you and ruin your plans.  At such times you need to adapt and come up with a new thought out plan.  Unfortunately, seeing my caster down to around 5 health I panicked.  This is one thing that I shouldn't have done seeing as I was expecting to take some damage with my baiting trick... albeit not as much as I did end up taking.  That said, the whole point of the bait was to neutralize his one model that could out threaten me and get around my defense to kill my squishy warlock.  With him gone he would have had a tough time to kill my caster had I camped 2-3 fury even with such low life.  So I should not have panicked but rather stuck to my guns and instead of going for a hasty and ill planned assassination run I should have sent Typhon against his Cannoneer.  Not forgetting to feat at that point would have also allowed me to withdraw Typhon and the Scythean to behind the wall where my opponent would have had a tough time to charge them with his lack of reach beasts.  Had I done this and concentrated my attacks on his army instead of losing my nerve and going after his warlock I think I would have had a considerably better chance of winning the game than with my foolish run on is warlock.

Sunday, March 16, 2014

Round 1

Yesterday, there was a  local tourney that comprised of 3 rounds with six 5 man teams where you could bring one or two 42 point lists.  If you decided to bring 2 lists then both had to be played at least once during the tournament.  I decided to take down my camera to take some pictures with the goal of doing write-ups after the tourney if my opponents had no objections.  Being the good sports that they are, none of them had any objections and some of them even reminded me that its picture time or automatically paused the clock (65min games) at the end of the turn so that I could comfortably take a picture.  So, here we are now after the tourney and here I am writing up my match results.

In the first round I got picked by an opposing Cygnar player.  He was running eHaley and another caster that I unfortunately dont recall.  My two lists were Tier4 Absylonia and pVayl so my decision was pretty simple for what I would use against him.

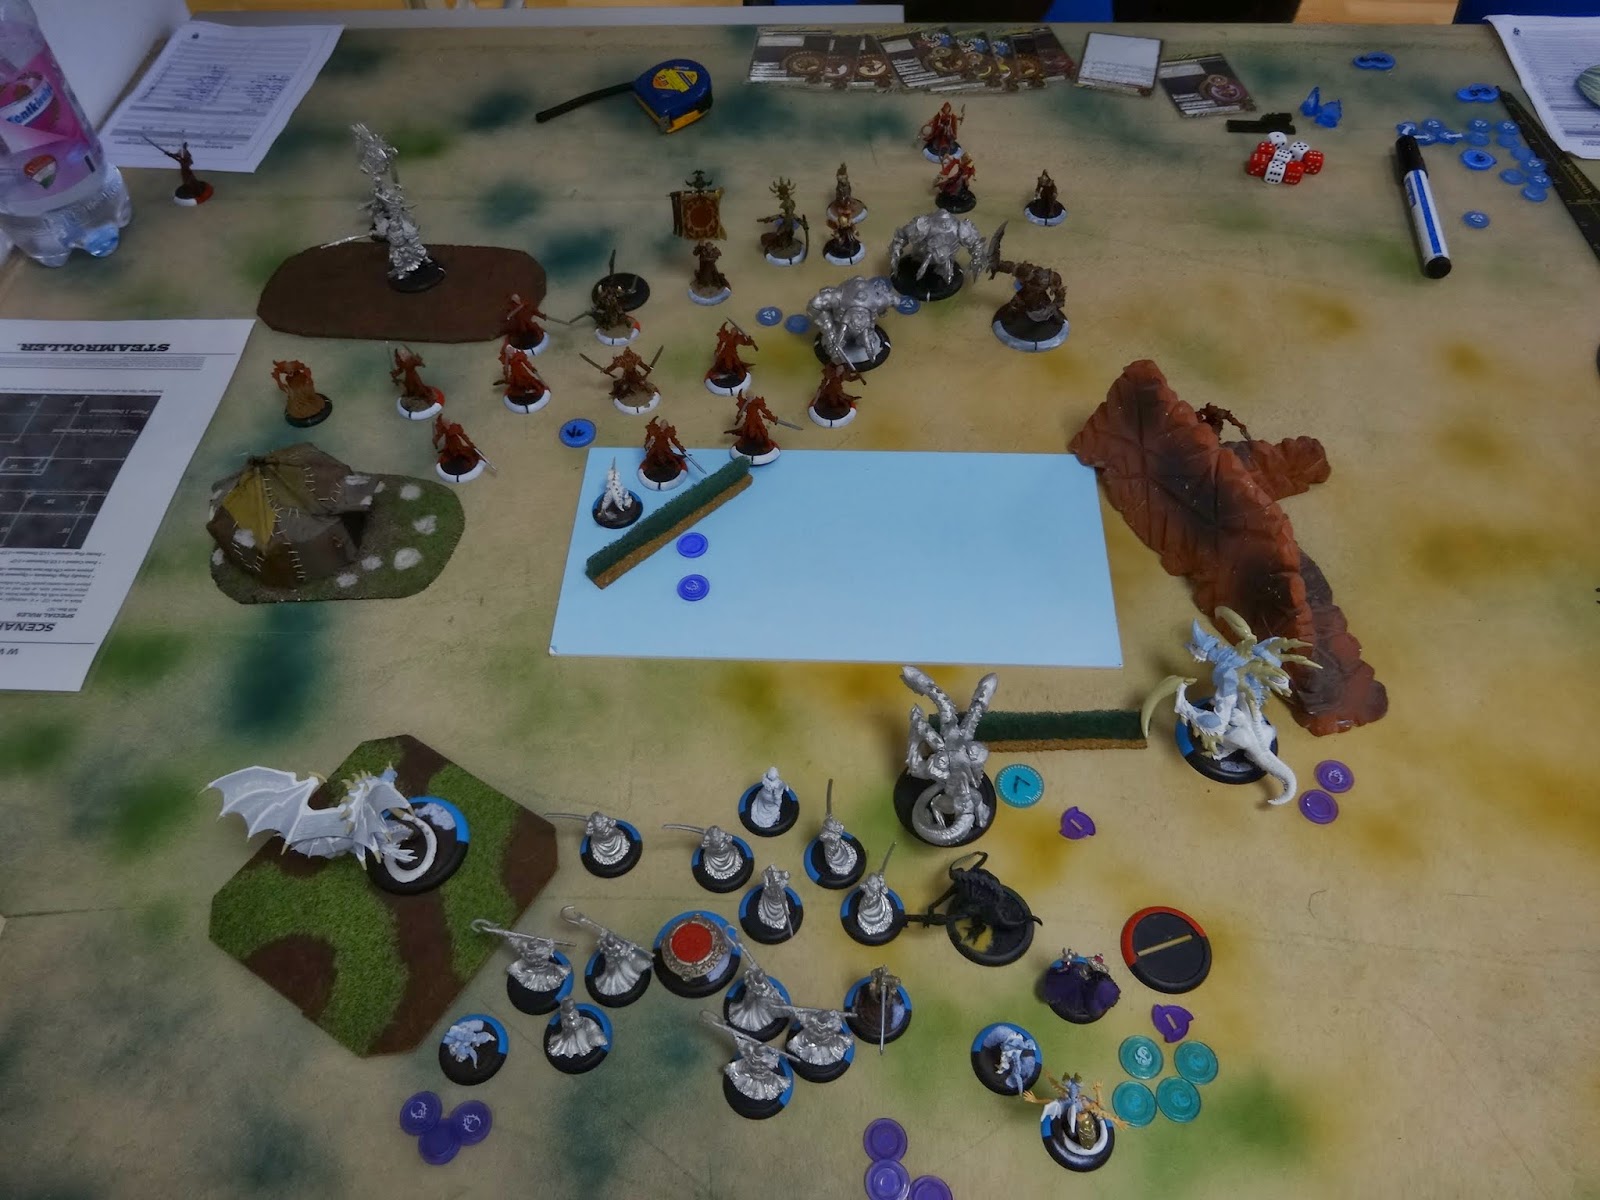
The scenario: Incursion
The lists:

Cygnar
Points: 42/42
Major Victoria Haley (*5pts)
* Lancer (6pts)
* Centurion (9pts) *bonded
* Squire (2pts)
Arcane Tempest Gun Mages (Leader and 5 Grunts) (6pts)
* Arcane Tempest Gun Mage Officer (2pts)
Stormblade Infantry (Leader and 5 Grunts) (5pts)
* Stormblade Infantry Officer & Standard (3pts)
* 3 Stormblade Infantry Storm Gunner (3pts)
Gorman di Wulfe, Rogue Alchemist (2pts)
Journeyman Warcaster (3pts)
Rhupert Carvolo, Piper of Ord (2pts)
Stormblade Captain (2pts)
Stormsmith Stormcaller (1pts)

Legion
Faction: Absylonia - Winds of Change
Casters: 1/1
Points: 42/42
Tiers: 4
Absylonia, Terror of Everblight (*5pts)
* Shredder (2pts)
* Shredder (2pts)
* Shredder (2pts)
* Angelius (8pts)
* Angelius (8pts)
* Proteus (10pts)
* Seraph (7pts)
The Forsaken (2pts)
The Forsaken (2pts)
The Forsaken (2pts)
The Forsaken (2pts)

I think I won the roll off but decided to go first seeing as Absylonia is a rush list and its good to jam them up into his face right away.  Deploying first, my thoughts were to put Proteus on the far left side due to herding and then going up the middle with Absylonia from where I could go left or right depending on the situation that unfolds.

The deployment

After seeing his deployment and that he went really light on the left side with only the Gun Mages and his Thorn while putting all his heavy hitters on the right side I quickly formulated my plan of pushing hard on the left side to dominate there while delaying on the right.  With this plan I started my first turn with my heavy advance moves...

End of turn 1 for player 2
Not much happened during the first turn other than movement and a couple upkeep spells for both of us so I just took a picture at the end of his turn.  Though for a quick breakdown of our first turns I put out Forced Evolution on the right side Angelius which ran into the right zone.  Carnivore went on the left Angelius, which, ran into the left zone along with Proteus.  The rest was just the shredders putting out Tenacity and advancing a bit forward along with the forsaken which siphoned off the excess fury that I riled on the heavy beasts.  My opponent put out Arcane shield on the Centurion with his Journeyman warcaster, cast Deceleration with his warcaster along with perhaps something else (don't recall) and just ran/moved up everything.

End of my 2nd turn

So time to put my plan into action to push hard on the left while playing delay tactic on the right.  I moved the right Angelius into the cover of the trees and as far as I could get him away from the enemy while staying in the zone.  Unfortunately, the trees that we were using for terrain couldn't be removed... meaning that I couldn't just tippy toe the zone and was actually sitting like 1.5" closer than I had to be.  Absylonia cast slipstream on herself and advanced towards the left zone to be able to dominate next turn and to move Proteus 2" closer to the Lancer.  She also cast Playing God on a shredder and finished up with putting Tenacity on herself.  The PG Shredder went rabid and ran into the Gun Mages to tie down 2 and to force a terror check which they easily passed.  The Seraph came across to the left to slipstream the left Angelius forward a little bit, which then charged the Gun Mages killing two and overtaking to tie down another 2 (one being hard to see due to the wings).  Proteus walks over the wall and shoots his tentacles at the Lancer, boosting both to hit and damage the Lancer gets pulled in and dinged up a little bit with his remaining bought attacks.  I didn't do as much damage as I would have liked but was confident that it wouldn't survive another round.  I had another Shredder run in and tie down the nearest Stormcaller and to act as a speed bump should he try to reposition towards the left.  Forsaken siphon off as much fury as I can but there is more fury out that I can siphon off for next turn though I expect a couple beasts to die anyways.

End of my opponent's second turn

He siphons off a focus from his squire and puts 3 focus on the Centurion in his Control Phase (shocker I know).  Stormblades assault the Angelius in the right that is sitting in the forest and has Forced Evolution on it.  He hopes for a lucky double sixes with the Stormblade Storm Gunners but everything misses.  He puts out Temporal Acceleration with eHaley on the Centurion, feats and Telekinesis the Shredder tying down his Stormcaller.  The Centurion activates and charges the Angelius from 11" + 2" reach.  If I could have been farther back in the forest than I'm not sure if he could have reached me but there is no need to go into that now.  Needing 10s to hit he boosts his first attack... 9... phew... he gets a free attack from Temporal Acceleration... grrr... boosts... 9... phew... he buys an attack and is about to roll but I mention he is better off boosting seeing as there is another focus beside the Centurion so he boosts and hits.  He rolls double sixes or a five and a six for damage and knocks out my spirit... that's what I get for opening my big mouth.  Oh but wait, as I type this I just realize that he used too much focus... 1 for charge, 2 boosted attacks and then another boosted bought attack which comes out to 5 focus.  Arrrggh, he forgot to remove focus from his jack during all the boosting/charging/etc.  Oh well, I'm 100% sure that it was just an accident that sometimes unfortunately happen in the heat of the moment.  So lets continue... the Lancer takes his swings at Proteus but only does about 4-5 damage.  The Gun Mages tied down in melee try to do their best but only one manages to hit the Shredder but that one does like 7-8 damage.  The Stormcallers and Gorman with an Acid Bomb kill the Shredder that was tying down one of the Stormcallers.

All in all, things are going according to plan for me.

End of my 3rd turn
I siphon off the one fury from Proteus and two off the Angelius thanks to herding but that still left it with 1-2 fury.  It passes its threshold check but the Shredder tying down the Gun Mages fails it.  It also fails to kill anything with its frenzy attack so ended up being a total failure.  Seeing as my opponent feated and all my models except the bottom left corner 4 figures (2 Forsaken, Absylonia, Shredder) were out of feat range he got to pretty much activate most of my army in the order that he wanted.  First he started off with my Angelius, which sacrificed its movement to take an armor piercing attack at his Centurion which missed with a 3 or a 4.  Great.  Next came my forsaken nearest the Angelius, which also sacrificed action to move forward a bit to contest the zone seeing as I felt that the Angelius wouldn't be able to hold it for much longer.  Next came the Seraph, which sacrificed movement to shoot his Stormblade Captain to death.  I only rolled a 1 or 2 for the strafe shot but in the end I only needed one shot to kill the solo (boosted the damage).  Next Proteus trashed the Lancer and then the Angelius killed another 2 Gun Mages.  Now, I could activate whatever I wanted but didn't have much left but no matter seeing as Ive already cleared my zone and was contesting his so mission accomplished already.  With Absylonia I put out a new Playing God on the Shredder that was by her side, moved into the zone to dominate and cast a Tenacity on myself for some extra protection and to lower my fury count.  The PG Shredder was run in with rabid to the right zone to tie down some of the Stormblades and so there was another contesting model.  Unfortunately, due to the Piper constantly giving out Heroic Call the Stormblades were immune to the terror check.  For good measure I ran in another Forsaken to contest his zone while moving up my last one so that it will be in position to kill his remaining infantry/solos on the left side.  I score 2 points.

End of my opponent's 3rd turn
 He once again hands out 3 focus to his jack.  I think he started with his warcaster, which did another boosted Telekinesis on the Shredder that was run into his zone to tie down some of Stormblades.  Cast Deadeye on the Stormblades, walked into the zone and then shot the Shredder in the back for some damage.  To my surprise he used his Centurion to kill the 2 nearest Forsaken though I would learn a few seconds later that this was a much wiser move than attacking the Angelius as I thought he would.  The now freed up Stormblades assaulted my Angelius and with the additional die rolls the first or second Stormblade Storm Gunner hit the Angelius allowing the whole unit to easily fry it to a crisp.  One from the unit ended up assaulting the 3rd Forsaken that was in the area and standing in the zone.  At the time I thought this to be a risky move and was to be vindicated when the Stormblade was unable to kill the Forsaken.  Leaving the Shredder and the Forsaken still there to be contested while there wasn't much left that he could use against them.  The Junior warcaster ended up shooting the wounded Shredder to death leaving me only with the Forsaken and some hope that I might be able to contest him for another round.  Unfortunately, his Stormcaller was to negate my hopes with a single lightning strike that fried the Forsaken.  His other Stormcaller went into my zone to contest and tried to fry my last Forsaken but his luck had run out.  His Gun Mages ended up missing all around but he was able to move one more into contest.  Gorman black oiled my Angelius and the nearest Gun Mage with a missed attack.  My opponent scores 2 points so its now 2-2.

End of my 4th turn
Absylonia siphoned off the 3 fury off Proteus and I'm forced to take 2 threshold checks.  One for the Angelius and one for the Seraph.  The Angelius proceeded to fail the check and skewered the Gun Mage that was also black oiled (mat and def penalties canceling each other out).  The Seraph however passed its check which was a good thing since I would need it to contest the enemy zone.  I moved the forsaken into position and used Blight Shroud on his remaining Gun Mages, Stormcaller and Gorman.  Killing all 4 with some nice rolls.  Absylonia cast Forced Evolution on the Seraph, Carnivore on Proteus and put out a Tenacity on herself while also feating to heal the heavily wounded Shredder.  Proteus then advanced on the remaining Gun Mage and Stormcaller and ripped them to pieces, which healed Absylonia back to full.  Thus clearing out my zone once more.  The Seraph charged the nearest Stormblade, which it killed thanks to some boosting through Proteus's herding.  My last surviving Shredder was also tossed into the enemy zone and engaged his Squire.  I score another 2 points... 4-2.

End of my opponent's 4th turn
Another 3 focus gets handed out to the Centurion.  The Squire attempted to run towards my zone but gets destroyed from the Shredder's free strike.  During eHaley's activation a boosted Telekinesis on the Seraph gets it put out of the zone and turned around.  Then he proceeded to shoot the Shredder for some damage.  The Journeyman Warcaster ran into my zone to contest while the Centurion walked over to the Seraph and killed it.  His Stormblades finished off the Shredder earning him another 2 points.  4-4

End of my 5th turn
Okay, so game is in the bag... all I need to do is kill his junior Journeyman Warcaster and Ive won.  I siphoned off the fury and choose Absylonia for the killing blow.  She spontaneously mutated wings and charged the Journeyman Warcaster.  I missed, but no worries, that's why she has a second hand.  Killed.  Okay game over... lets go for some kill points so I put out Forced Evolution on the Proteus.  Proteus activates moves forward and pulls in the Centurion with a ranged attack and starts pummeling.  Activation ends... and I go OMFG!!!!!  I'm not contesting either!!!  Proteus was supposed to run over and contest for the win.  AAARRRGGHHHH!!!  Okay, nothing to do now but to fly in with the Angelius.  I do a quick measure and find it to be in but just barley.  We do some more closer measurements and no the Angelius is just short by about 1/4".  DAMN IT!!!  I know Ive just completely blown the game.  Forsaken runs towards his zone.  Turn ends with both of us scoring... 6-6.

End of my opponent's 5th turn

Focus handed out to the Centurion... long story cut short the Stormblades and Centurion killed the Angelius, Proteus and the Forsaken.  Neither side is contested so another 2 points for 8-8.

Absylonia runs to the far edge of my zone for another round of scoring.  10-10.  He contests and its over 10-12.

Quite frustrating to lose like this seeing as the game was in the bag and had I not lost my concentration for just that split second and run in with the Proteus I would have won.  Cant blame anybody but myself for my loss and was kicking myself about it for the better part of the day.

As for the match itself.  It unfolded pretty much as I had planned and I wouldn't have changed much, except for my obvious HUGE mistake towards the very end.  However, outside that one glaring mistake, I think that my game plan of delaying his scoring on the right flank while dominating the left worked wonderfully well and should have in all reality (except apparently this one :D) brought me the game.

Wednesday, March 12, 2014

CoC - Angels of Death


As one of my first Convergence of Cyriss purchases, I've had these angels for a while now, which, unfortunately means that I don't have a pre-assembly picture of them for you to see what comes in a blister.  In exchange, I do have a couple pictures of my fully painted unit for your viewing pleasure.


I went with a fairly simple color scheme for my army.  The basic concept of my army colors is Thamar Black for the armor parts to give the models a dark look.  For some contrast colors I went with Skorne Red, which, I think goes really well with the black.  In the Angels case, the red was used on the wing blades and the face plate.  The inner working parts like cogs/gears/tubing/hydraulics are painted Molten Bronze to complement the dark look.  For the weapons I again chose a darker pigment with the Pig Iron color and finally for the the smaller details like energy lines/eyes/lights I went with Beaten Purple.  Once the model was finished I gave it a glossy finish to give it the nice and shiny factory polish look.  As for the front arc on the base, I went with Ember Orange to make it really stand out and apart from the model.


By now some people may have noticed that I'm missing a piece from all of my models.  What piece?  The loin clothes.  I for one, don't really see the point of a robot having a small piece of fabric attached to it so I decided to leave it off completely.  Not to mention that I couldn't come up with a color to paint it and by just looking at it I saw that it will be hard to pin and I'm an ardent supporter of pinning everything.  So I guess I should mention here that these models are all pinned at the separate parts that they came in (arms/wings/bent leg/base).  I also ended up cutting off the little pile of rocks that the "grunt" models came with since that didn't really go well with my custom basing.


Here are a couple closer shots to see some of the smaller details that was done with Beaten Purple like the eyes, runes on the sword and if you look closely enough you can see some power lines on the hands.  Unfortunately, some of the other smaller details on the sword guard or the chest Cyriss symbol aren't visible.

All in all, I'm fairly pleased with how they turned out and that I already have a full unit painted.  Especially seeing as I'm doubtful that I will be painting anymore of them in the future seeing as I'm not planning on playing Aurora tier list and finding it hard to put them in other lists.

Up next for CoC... Attunement Servitors... probably... :).

Tuesday, March 4, 2014

The Beginning

Well this is my first ever blog so we'll see how it goes...  not sure yet how long of a lifespan it will have or how often I will be able to get around to post but I figured Id give it a shot so here we are.

My main urge to create a blog was to document and post about me collecting and building the new Warmachine: Convergence of Cyriss faction.  I envision to show the hobby side of this war game with posts about model assemblies, ideas/tips, my finished models, and any other tidbits I can think up along the way.  Though, I do plan on not focusing on only the hobby aspect of the game and will more than likely post some battle reports and local tourney experiences as well.  While the hobby aspect will mainly revolve around CoC for the most part the battle reports will not.  At least not until I have gathered and built a viable army that I could actually field for starters.

Well these are the current plans... lets see how it goes.